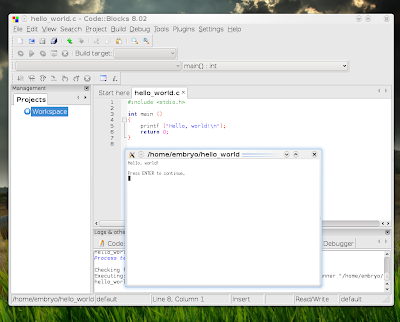
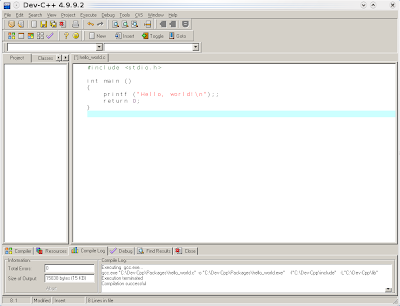
One of the many questions users who switch from Windows to Linux have is how to compile C/C++ sources and what IDEs (Integrated Development Environment) Linux has to offer. Most of them study C or C++ at school or home and are usually used from Windows with an IDE like Dev-C++ or Code::Blocks.
In this article I'll give a few explanations on how to compile software for studying purposes on Linux (and particularly Ubuntu), what are the most common ways, what I consider to be the most effective method and which are the most popular applications to use for programming in those languages.
I'll divert a little to say that Dev-C++, although a wonderful IDE on Windows, is no longer maintained, and even though a port used to be around for Linux, it was abandoned too (as far as I know). Instead, for those who would like a replacement which works and behaves the same way, I can warmly recommend Code::Blocks, which has an actively maintained port and it's easy to compile and install. According to the details I could find on #ubuntu @ Freenode, Code::Blocks will also be included in the Intrepid Ibex (the next Ubuntu release) repositories, in universe.
Back to our topic. I think the simplest way to start with C/C++ in Ubuntu is to use first an editor like Nano and create a source file, then compile it using gcc (GNU Compiler Collection) in command line. But first, to install the GNU compiler and several other utilities for compiling sources, use:
sudo apt-get install build-essential
build-essential is a meta package - a package which only depends on other packages, so installing it will automatically install several tools like gcc, g++ and make.
Next, create your source file using a text editor of choice (I used Nano for this example):
nano main.c
Enter the content, e.g.:
#include <stdio.h>
int main ()
{
printf ("Hello, world!\n");
return 0;
}
Notice that I also included a newline after the close bracket, otherwise the compiler will issue a warning. Save it with CTRL+O, then exit Nano using CTRL+X. To compile your source, simply use:
gcc main.c -o myapp
The output, myapp, will automatically be executable, so to run it use:
ubuntu@ubuntu:~$ ./myapp
Hello, world!
This is the simplest way of creating and compiling C or C++ code.
Regarding more complex, powerful IDEs, you can try Vim, Emacs (which can be run both in CLI mode using emacs --no-window and in GUI mode) or even the user-friendly Nano. Nano can be configured by editing (or creating if it does not exist yet) the ~/.nanorc file, where ~ is your home directory. The global configuration file is located in /etc/nanorc. Also, you can read this tutorial on how to enable syntax highlighting in Nano.
Among the good editors which use a graphical interface are Kate, Gedit, Geany, KDevelop, Anjuta, Code::Blocks or Eclipse. These are not all though, but I recommend trying those first and see which one fits. I'll briefly review some of them below, so you can have a general idea about each of them.
Kate
Its name means KDE Advanced Text Editor, but Kate is definitely not only a text editor. It supports highlighting in many languages, indentation, spell-checker, block selection mode, and it's highly configurable. Kate comes by default in Kubuntu or can be installed using sudo apt-get install kate.
Homepage
sudo apt-get install kate
Gedit
This is the default text editor in GNOME. It can be used as a simple IDE too. It comes installed by default in Ubuntu.
Homepage
sudo apt-get install gedit
Geany
Yet another editor written in GTK. It's pretty light and includes the most common features an IDE should have, so it's a good alternative to Gedit.
Homepage
sudo apt-get install geany
KDevelop
This is the KDE advanced IDE, offering the tools and advanced features of a full IDE. I recommend starting with a text editor rather than using this one for studying purposes. However, if you especially want to develop KDE applications, KDevelop is the way to go.
Homepage
sudo apt-get install kdevelop
Code::Blocks
This is the powerful port of Code::Blocks for Windows, using the wxWidgets interface. In my opinion it's very fit for studying C/C++ on Linux. Although not included in Hardy Heron, Code::Blocks will be included in the Intrepid Ibex repositories.
Homepage
Update: Ubuntu 9.04 comes with Code::Blocks included in the repositories, so you can install it using the usual sudo apt-get install codeblocks command. Ubuntu 8.10 and 8.04 users can follow the instructions below:
Notice: It is also a good idea to install xterm (a terminal application just like GNOME Terminal or Konsole), since Code::Blocks uses it to show the output of your programs.
sudo apt-get install xterm
1. Install the dependencies and compiler tools
sudo apt-get install build-essential
sudo apt-get install libwxgtk2.8-dev wx-common libgtk2.0-dev zip
2. Download the source code
Get the source from the official website, here, next uncompress it using:
tar -xjf codeblocks-8.02-src.tar.bz2
3. Compile it
Change the working directory to codeblocks-8.02-src and issue as usual:
./configure
make
sudo make install
Finally, run ldconfig as root:
sudo ldconfig
This should do it. You can run Code::Blocks by typing codeblocks in a terminal or pressing ALT+F2 and writing codeblocks in the run dialogue that appears.

Anjuta
Written in GTK, Anjuta is a powerful development environment for C and C++, which also allows you to create GNOME applications.
Homepage
sudo apt-get install anjuta
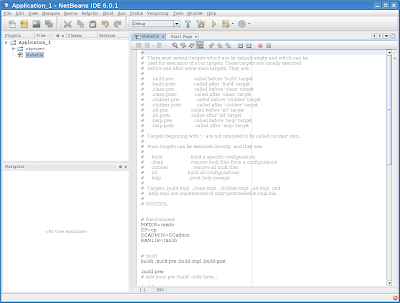
Addition: NetBeans
NetBeans is an advanced IDE written in Java from Sun Microsystems, and can be used for developing C/C++ code too.
Homepage
sudo apt-get install netbeans-ide

Addition: Eclipse CDT
The package eclipse-cdt provides the Eclipse IDE with C/C++ development plugins. I found it slower than the others IDEs mentioned here, especially the interface.
Homepage
sudo apt-get install eclipse-cdt
Addition: CodeLite
CodeLite is an open-source IDE similar with Code::Blocks. To install it, download the latest Ubuntu build (DEB package) from the official website, make sure the current working directory is the one where you saved it, and type the following command (replacing the filename with the latest name):
Homepage
sudo dpkg -i codelite_1.0.2785-ubuntu0_i386.deb
Emacs and Vim
Both Emacs and Vim became legends on Linux and they both have fans who continuously argue on which one's better. I personally prefer Emacs over Vim, but I recommend you to try both and see which one fits you better. Emacs is not only an IDE, it's also an e-mail client, eventually IRC client, file browser and more. Regarding speed, Emacs is way slower than Vim, and as IDEs, both include great features. Both Emacs and Vim use their own concepts and keyboard shortcuts, so as a beginner you'll (probably) find them a little hard to learn, but this doesn't mean you don't have to use them. Put some effort into learning at least one of them and you'll see in time how helpful this learning process is. Another note: most systems (including web servers which you'll usually ssh to in order to manage your web page - if you have one) include Vim by default, but not Nano or Emacs.
Emacs homepage
Vim homepage
sudo apt-get install emacs
sudo apt-get install vim
Update: As I already mentioned earlier in this article, Dev-C++ is not available on Linux, however if you really, really want to work in it instead of a native IDE, you can successfully run it through Wine. To install Wine either type sudo apt-get install wine (which will install 1.0) or to install the latest release use one of the following tutorials (they all work for Ubuntu 8.10, 9.04 Jaunty Jackalope and the latest Wine release): tutorial 1, tutorial 2, tutorial 3. After setting up Wine download Dev-C++ from here, and run wine devcpp-4.9.9.2_setup.exe to install it. Refer to this page to see what additional libraries you will need for running binaries compiled with Dev-C++. The executables will be located by default inside the ~/.wine/drive_c/Dev-Cpp/Packages directory, where ~ is your home directory.

Have some other questions regarding compiling or using IDEs on Linux? Or maybe a correction or suggestion regarding this tutorial? Please feel free to discuss in the comments below.
Updated: April 3, 2009
Visit ashes garrett for Daily Updated Hairstyles Collection
In this article I'll give a few explanations on how to compile software for studying purposes on Linux (and particularly Ubuntu), what are the most common ways, what I consider to be the most effective method and which are the most popular applications to use for programming in those languages.
I'll divert a little to say that Dev-C++, although a wonderful IDE on Windows, is no longer maintained, and even though a port used to be around for Linux, it was abandoned too (as far as I know). Instead, for those who would like a replacement which works and behaves the same way, I can warmly recommend Code::Blocks, which has an actively maintained port and it's easy to compile and install. According to the details I could find on #ubuntu @ Freenode, Code::Blocks will also be included in the Intrepid Ibex (the next Ubuntu release) repositories, in universe.
Back to our topic. I think the simplest way to start with C/C++ in Ubuntu is to use first an editor like Nano and create a source file, then compile it using gcc (GNU Compiler Collection) in command line. But first, to install the GNU compiler and several other utilities for compiling sources, use:
sudo apt-get install build-essential
build-essential is a meta package - a package which only depends on other packages, so installing it will automatically install several tools like gcc, g++ and make.
Next, create your source file using a text editor of choice (I used Nano for this example):
nano main.c
Enter the content, e.g.:
#include <stdio.h>
int main ()
{
printf ("Hello, world!\n");
return 0;
}
Notice that I also included a newline after the close bracket, otherwise the compiler will issue a warning. Save it with CTRL+O, then exit Nano using CTRL+X. To compile your source, simply use:
gcc main.c -o myapp
The output, myapp, will automatically be executable, so to run it use:
ubuntu@ubuntu:~$ ./myapp
Hello, world!
This is the simplest way of creating and compiling C or C++ code.
Regarding more complex, powerful IDEs, you can try Vim, Emacs (which can be run both in CLI mode using emacs --no-window and in GUI mode) or even the user-friendly Nano. Nano can be configured by editing (or creating if it does not exist yet) the ~/.nanorc file, where ~ is your home directory. The global configuration file is located in /etc/nanorc. Also, you can read this tutorial on how to enable syntax highlighting in Nano.
Among the good editors which use a graphical interface are Kate, Gedit, Geany, KDevelop, Anjuta, Code::Blocks or Eclipse. These are not all though, but I recommend trying those first and see which one fits. I'll briefly review some of them below, so you can have a general idea about each of them.
Kate
Its name means KDE Advanced Text Editor, but Kate is definitely not only a text editor. It supports highlighting in many languages, indentation, spell-checker, block selection mode, and it's highly configurable. Kate comes by default in Kubuntu or can be installed using sudo apt-get install kate.
Homepage
sudo apt-get install kate
Gedit
This is the default text editor in GNOME. It can be used as a simple IDE too. It comes installed by default in Ubuntu.
Homepage
sudo apt-get install gedit
Geany
Yet another editor written in GTK. It's pretty light and includes the most common features an IDE should have, so it's a good alternative to Gedit.
Homepage
sudo apt-get install geany
KDevelop
This is the KDE advanced IDE, offering the tools and advanced features of a full IDE. I recommend starting with a text editor rather than using this one for studying purposes. However, if you especially want to develop KDE applications, KDevelop is the way to go.
Homepage
sudo apt-get install kdevelop
Code::Blocks
This is the powerful port of Code::Blocks for Windows, using the wxWidgets interface. In my opinion it's very fit for studying C/C++ on Linux. Although not included in Hardy Heron, Code::Blocks will be included in the Intrepid Ibex repositories.
Homepage
Update: Ubuntu 9.04 comes with Code::Blocks included in the repositories, so you can install it using the usual sudo apt-get install codeblocks command. Ubuntu 8.10 and 8.04 users can follow the instructions below:
Notice: It is also a good idea to install xterm (a terminal application just like GNOME Terminal or Konsole), since Code::Blocks uses it to show the output of your programs.
sudo apt-get install xterm
1. Install the dependencies and compiler tools
sudo apt-get install build-essential
sudo apt-get install libwxgtk2.8-dev wx-common libgtk2.0-dev zip
2. Download the source code
Get the source from the official website, here, next uncompress it using:
tar -xjf codeblocks-8.02-src.tar.bz2
3. Compile it
Change the working directory to codeblocks-8.02-src and issue as usual:
./configure
make
sudo make install
Finally, run ldconfig as root:
sudo ldconfig
This should do it. You can run Code::Blocks by typing codeblocks in a terminal or pressing ALT+F2 and writing codeblocks in the run dialogue that appears.

Written in GTK, Anjuta is a powerful development environment for C and C++, which also allows you to create GNOME applications.
Homepage
sudo apt-get install anjuta
Addition: NetBeans
NetBeans is an advanced IDE written in Java from Sun Microsystems, and can be used for developing C/C++ code too.
Homepage
sudo apt-get install netbeans-ide

Addition: Eclipse CDT
The package eclipse-cdt provides the Eclipse IDE with C/C++ development plugins. I found it slower than the others IDEs mentioned here, especially the interface.
Homepage
sudo apt-get install eclipse-cdt
Addition: CodeLite
CodeLite is an open-source IDE similar with Code::Blocks. To install it, download the latest Ubuntu build (DEB package) from the official website, make sure the current working directory is the one where you saved it, and type the following command (replacing the filename with the latest name):
Homepage
sudo dpkg -i codelite_1.0.2785-ubuntu0_i386.deb
Both Emacs and Vim became legends on Linux and they both have fans who continuously argue on which one's better. I personally prefer Emacs over Vim, but I recommend you to try both and see which one fits you better. Emacs is not only an IDE, it's also an e-mail client, eventually IRC client, file browser and more. Regarding speed, Emacs is way slower than Vim, and as IDEs, both include great features. Both Emacs and Vim use their own concepts and keyboard shortcuts, so as a beginner you'll (probably) find them a little hard to learn, but this doesn't mean you don't have to use them. Put some effort into learning at least one of them and you'll see in time how helpful this learning process is. Another note: most systems (including web servers which you'll usually ssh to in order to manage your web page - if you have one) include Vim by default, but not Nano or Emacs.
Emacs homepage
Vim homepage
sudo apt-get install emacs
sudo apt-get install vim
Update: As I already mentioned earlier in this article, Dev-C++ is not available on Linux, however if you really, really want to work in it instead of a native IDE, you can successfully run it through Wine. To install Wine either type sudo apt-get install wine (which will install 1.0) or to install the latest release use one of the following tutorials (they all work for Ubuntu 8.10, 9.04 Jaunty Jackalope and the latest Wine release): tutorial 1, tutorial 2, tutorial 3. After setting up Wine download Dev-C++ from here, and run wine devcpp-4.9.9.2_setup.exe to install it. Refer to this page to see what additional libraries you will need for running binaries compiled with Dev-C++. The executables will be located by default inside the ~/.wine/drive_c/Dev-Cpp/Packages directory, where ~ is your home directory.

Have some other questions regarding compiling or using IDEs on Linux? Or maybe a correction or suggestion regarding this tutorial? Please feel free to discuss in the comments below.
Updated: April 3, 2009
Visit ashes garrett for Daily Updated Hairstyles Collection


